Black Templar


This project was made for Sci-Fi Valley Con 2023.

Two people in elaborate black and red science fiction armor costumes posing at a convention, one with a skull decoration on the shoulder, and the other with a large backpack-like weapon on the back.

The inspiration for this cosplay were the Joytoy action figures.

A detailed action figure of a heavily armored futuristic knight wielding a chainsaw and a chainsword, with a black helmet, armor with red accents, and a cloth apron with red crosses, posed against a plain dark background.
A detailed action figure of a Warhammer 40,000 character, posed with a large chainsword in one hand and a pistol in the other. The figure is clad in black armor with a bone-colored apron-like cloth and a white cape. It has red accents and metallic chains on the arms and sword.

Since the majority of this project will be freehand, I needed a way to scale my reference material. This is a very old method I’ve used for both my Terminator Chaplain, and my Jim Raynor costumes.

It starts by making a grid of squares. These grid will then represent 1ftx1ft spacing. I am 6ft even, so I can figure out how big I want something to be, based on me measuring 6 squares high. In this case, the character will be roughly 1ft taller than me.

A compilation of five miniature figurines of armored warriors in black, white, and red armor, each dressed in medieval or fantasy style with weapons and adornments.
Three Warhammer 40k space marines figurines in white armor with red, black, and metallic accents, each holding weapons and accessories, displayed against a gray background with black outline of human figures on each side.

But originally I was going to use a template. This template was from Crawdaddy Cosplay on Etsy. He had templates for the entire mark X armor set, but these Sword Brethrens armor has a few key differences. And I’d find myself modifying all of the templates. So from here on, I decided to freehand the rest.

A person holding a paper and tape mannequin torso model on a work table with scissors and a cutting mat.
A workspace with a large white 3D model of a spaceship or futuristic vehicle under construction, with sketches and measurements drawn on it. There are two computer monitors, a skull model, a water bottle, scissors, tape, a ruler, and a pair of scissors on the desk.

The process for free-handing such a large costume requires a ton of cardboard. Thankfully, we had just moved the year before, so we had a lot of cardboard boxes.

This method uses the reference images show previously, and on the cardboard I draw out the 1ftx1ft squares. And from there I draw out the armor pieces within those squares in their profile position, front, and side.

From there, i then just fill in the gaps as best I can, until I have a 3d shape.

Once that is done, I wrap the 3d cardboard model in plastic wrap, and then duct tape. This is your basic duct tape template. I then draw out my edges, remove the template from the cardboard model, and I cut the template in strategic locations so that it can lay down flat.

Once the template is flat, i transfer that to foam, and cut and glue it all together. The end result should be very similar to the cardboard shape originally made.

A partially assembled cardboard box structure with marked measurements and duct tape, placed on a cutting mat with grid lines.
A large cardboard structure with multiple compartments, taped together with gray tape, situated on a cutting mat with a ruler nearby. There is a skull and various tools and supplies in the background.
A gray, dome-shaped object made from crinkled duct tape, placed on a work surface with tools and objects nearby.
A semi-circular white foam or plastic structure with markings on it, placed on a workbench with a ruler and scissors nearby.

I repeated this same process with all the other body pieces. These being the shins.

A large, cylindrical object wrapped in silver duct tape on a work table with a cutting mat and ruler; there is a human skull model in the background.
A large object wrapped in reflective silver material with purple markings, placed on a dirty worktable with measurement rulers. In the background, there is a skeleton and a wooden or metal clamp.
A large white paper model of a rocket with blue outlines and markings, placed on a work table with craft materials and a skull in the background.
A large piece of paper with blue drafted lines and markings, standing upright on a work table. The table has a cutting mat and various small items, with a skull model and a computer mouse nearby.

The backpack.

A model spaceship made of cardboard and foil on a cluttered workbench, with skulls, a computer monitor, a mug, and various craft supplies in the background.
A metallic, handcrafted sculpture resembling a stylized or abstract foot, placed on a worktable with a skull and cutting mat nearby.
A partially constructed model of a spaceship or futuristic vehicle made from white and gray foam boards with visible sketches and markings, placed on a worktable in a workshop.
A detailed model of a science fiction spaceship or aircraft made of white cardboard with black markings, placed on a table next to two skull replicas, in a room with a laptop and a computer monitor.
A large, detailed model of a space helmet in progress on a worktable, with various tools, foam pieces, and a computer monitor nearby.
A paper model of a spacecraft or rocket, constructed from white cardboard with black markings, placed on a cluttered worktable with drafting tools, a black and yellow mug, and scattered papers.

For the shoes, I used a pair of loafers glued to some thing EVA foam blocks using a ton of E6000. The toes would be articulated, so that walking would be a lot easier. At the tip of the toe would be a weight, to drop the toe, and I added a strap to hold the toe from sagging past a flat position, so that I wouldn’t snag the toe while walking.

A black shoe with a strap, mounted on a black block, secured with masking tape, on a cutting mat with paint stains and grid lines.
A white shoe pattern template with black markings on a grid work surface, labeled 'shoe left.'
A work in progress model of a shoe with paper templates attached, labeled 'shoe left,' on a worktable with a cutting grid and a skull in the background.

I also used the same technique to build the base arms and legs. (These are the most photos I can find of this process.

I also started making the midsection as well. I did this by wrapping foam around my midsection to get a basic shape that i could slide into, glued that together, and then cut out sections for under my arms, so this could slide up high.

I then started adding bits for the stomach plates, and the belt.

I left the bottom portion open for ease of mobility and to make it easier to put on and take off.

Detailing comes after fitment and proportion checks.

A cardboard box covered with painter's tape, placed on a cluttered worktable with scissors, a marker, and a metal ruler nearby.
A craft project on a worktable covered with a grid cutting mat, made of cardboard and silver duct tape, with a skull visible in the background.
A DIY robot costume made of white foam board with black outline details, resting on the floor in a room with various objects, including a mannequin head and a computer.

Before I moved forward with detail, I started putting pieces on together to check how they were looking together. I did this alot, with each piece that I made.

And propertion issues were addressed before detail. If a piece was too big, too small, too short, or too long, I took note, and adjusted them as needed. In some cases, remaking a piece entirely.

Person taking a mirror selfie while wearing a costume made of white foam armor with black lines, resembling medieval or sci-fi armor, in a cluttered room with various objects and boxes.

I wish I had more photos for the helmet. This was also a hand made template, that went through several modifications.

The internal cooling was a USB powered fan, that connected to an external USB charger that would be tucked in the chest piece. The fan pulled air from the opening in the forehead, and blew cool air onto my forehead. Not only did this help keep me cool, but it also helped to defog the visor.

One major modification was widening the helmet. Originally the helmet was too thin, but the visor in front looked too good for me to cut up. So I chose to split it down the back, and pull it apart that way, and that worked to get the width that I wanted. (it also helped fit the lenses in the eyes later on too.)

With this extra width in the back, I took advantage of the gap left inside the inner shell of the helmet, and made a channel leading from the fan to the rear of the helmet. This doubled the source of fresh air for the fan!

A work-in-progress prototype of a robot helmet or mask, made from white foam or plastic, with black markings and measurements, placed on a black stand. A human skull model is visible to the left on the worktable.
The interior of a light-colored, vintage radio shows a switch labeled
The image shows the interior of a white, curved ceramic or plaster skull model, possibly a medical or anatomical replica, with an internal compartment containing black wires and a USB connector.
A workshop project of a Stormtrooper mask from Star Wars, with black marker sketches and some areas painted white, being held in a person's hand.
A costume mask resembling a stylized skull with markings, eye holes, and a star emblem on the side, resting on a workbench.
Interior of a military helmet showing wiring and internal components, with a white outer shell and some black wires.
The interior of a white, hollow, dome-shaped structure with internal supports and wiring.

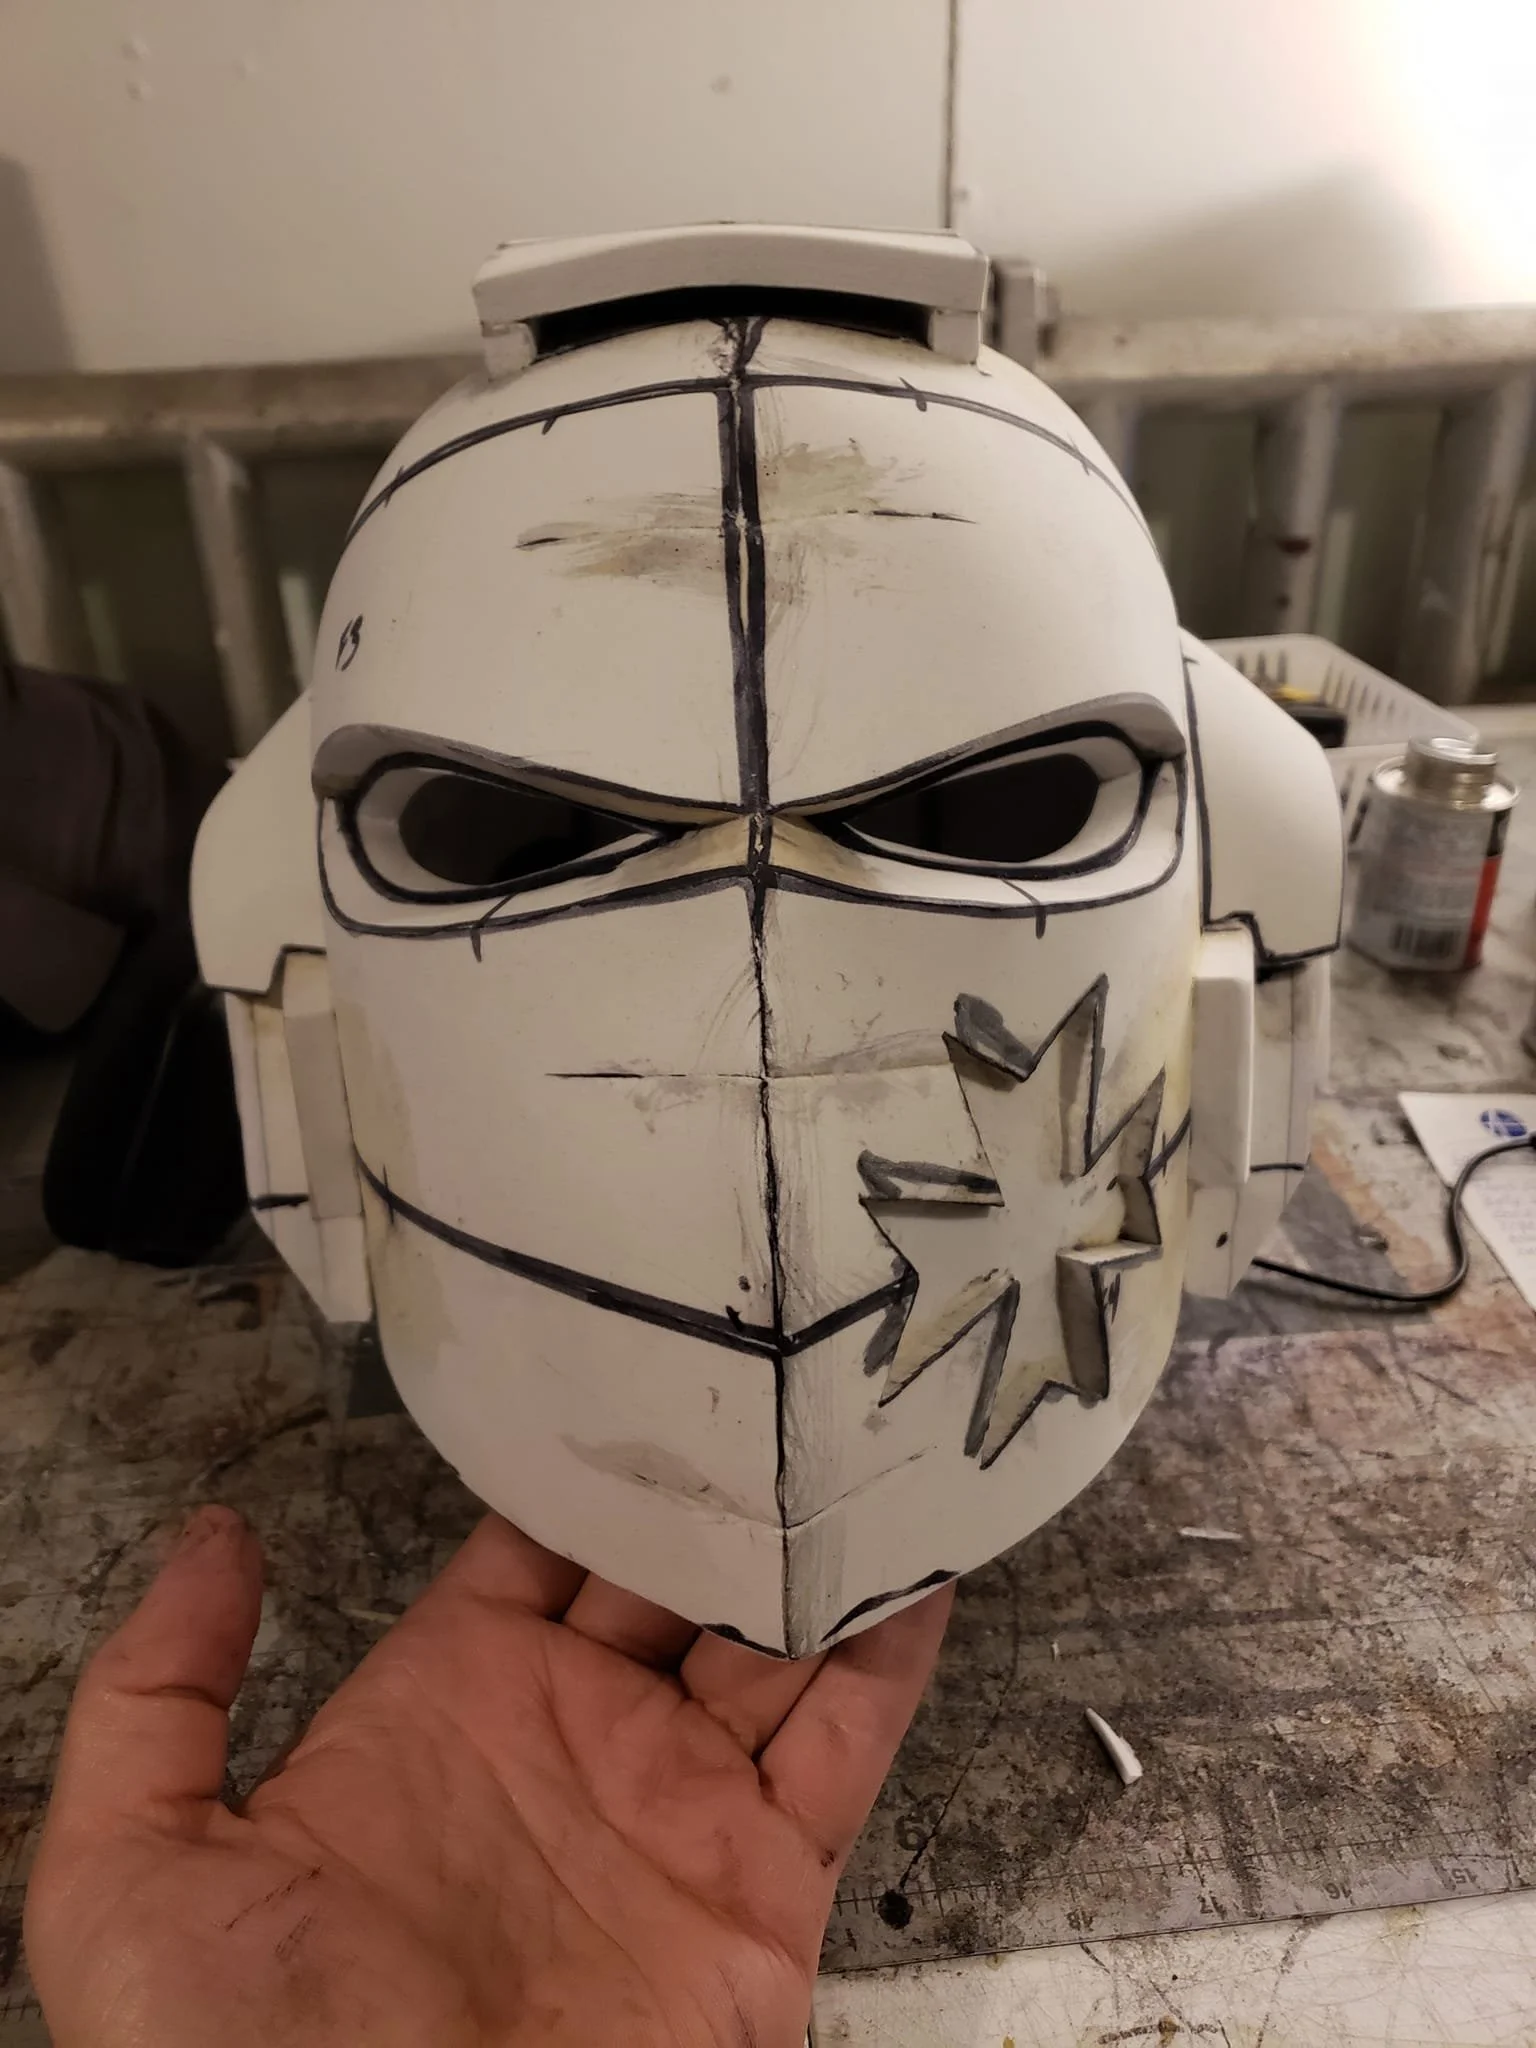
I Then started the detailing phase. The gorget on the chest armor looked good at first, but wasn’t correct to the action figure. so I ripped it off, and lowered it about an inch or two.

I also added details on the back, and added more support material inside the chest, where there were originally open cavities, with a stronger foam brand.

-Take note of the last photo, you can see that I had added layers of foam to the shoulder. This was not just to raise the chest, but to also fill in the raised portions in the armor, that runs from the chest, over the shoulders, and down the back.

Cardboard and foam armor costume resembling futuristic science fiction armor in progress on a desk, with computer monitors and coffee mug in background.
Unfinished large prop or model resembling a robotic or sci-fi helmet on a cluttered workspace table with computers, tools, and supplies.
A work in progress cardboard or foam model of a spaceship or futuristic vehicle on a work desk, with tools and other objects nearby.
A cardboard and foam replica of the Millennium Falcon from Star Wars, partially assembled on a table with tools and a computer monitor nearby.
A partially constructed or assembled space helmet model on a cluttered workspace. The helmet is white with black interior padding and has an opening for the face.

Then came the arm details. I made the chains and cuffs out of foam, and cut and sanded each chain link round, so that they wouldn’t get hung up on each other.

Then they all got put together, and attached to the arms.

For the arms, I added a shoulder bit to the top of the forarm. This will be what attaches the arms to the body, and where the pauldrons will mount.

I also made the gloves as well, these were made from a regular pair of work gloves, with EVA foam glued to each finger. 2mm on the sides, and 10mm on the tops. And then 5mm for the extra plating over top the wrist.

Two white, oval-shaped molds with black clamps on a workbench.
Stacked black foam blocks with rectangular holes on a work table with grid pattern, in a workshop or construction setting.
A large heavy-duty black chain with thick links, partially shaped like a star, resting on a table with a white foam block nearby.
A humanoid robot torso with a black chain connecting its arms, and a white and black head with googly eyes, sitting on a wooden surface.
Disassembled mascot costume head with black chains attached, placed on a dusty table in a workshop.
Assorted prop replicas and costumes from science fiction movies, including a large missile or rocket, and pairs of futuristic black and white boots, displayed on a black carpeted floor.
A robotic hand with black fingers and a black casing over the wrist, positioned over a cluttered workspace with a cutting mat, a whiteboard with notes, and various tools.
Pair of large, black, rubber tires with tread pattern, mounted on black structures, placed on a work table with tools and supplies around.

Then I started detailing the shins. I added a sword to the left shin, added the knee guard, the ankle guard, the extra lip over the ankle, and some extra foam inside to bump up against my leg, so that the shin wouldn’t bend backwards in an unnatural way.

A work-in-progress craft project of a dagger with a skull at the center, made from various carved and painted foam pieces on a textured craft table.
A person holding a foam model of a human torso with markings and a small skull attached to the front, used for anatomical or costume design purposes.
A partially assembled foam and plastic robot costume on a worktable, with visible construction markings and parts, next to a mirror.
A detailed model of a human torso and pelvis made from cardboard and foam, with markings and clamps, situated indoors on a rug.
Large robotic mannequin with a curved white and black body, marked with blue lines for construction, in an industrial workshop or storage area.
A person holding a small black object inside a white cylindrical robotic vacuum cleaner with an open top, showing internal components, on a carpeted floor.

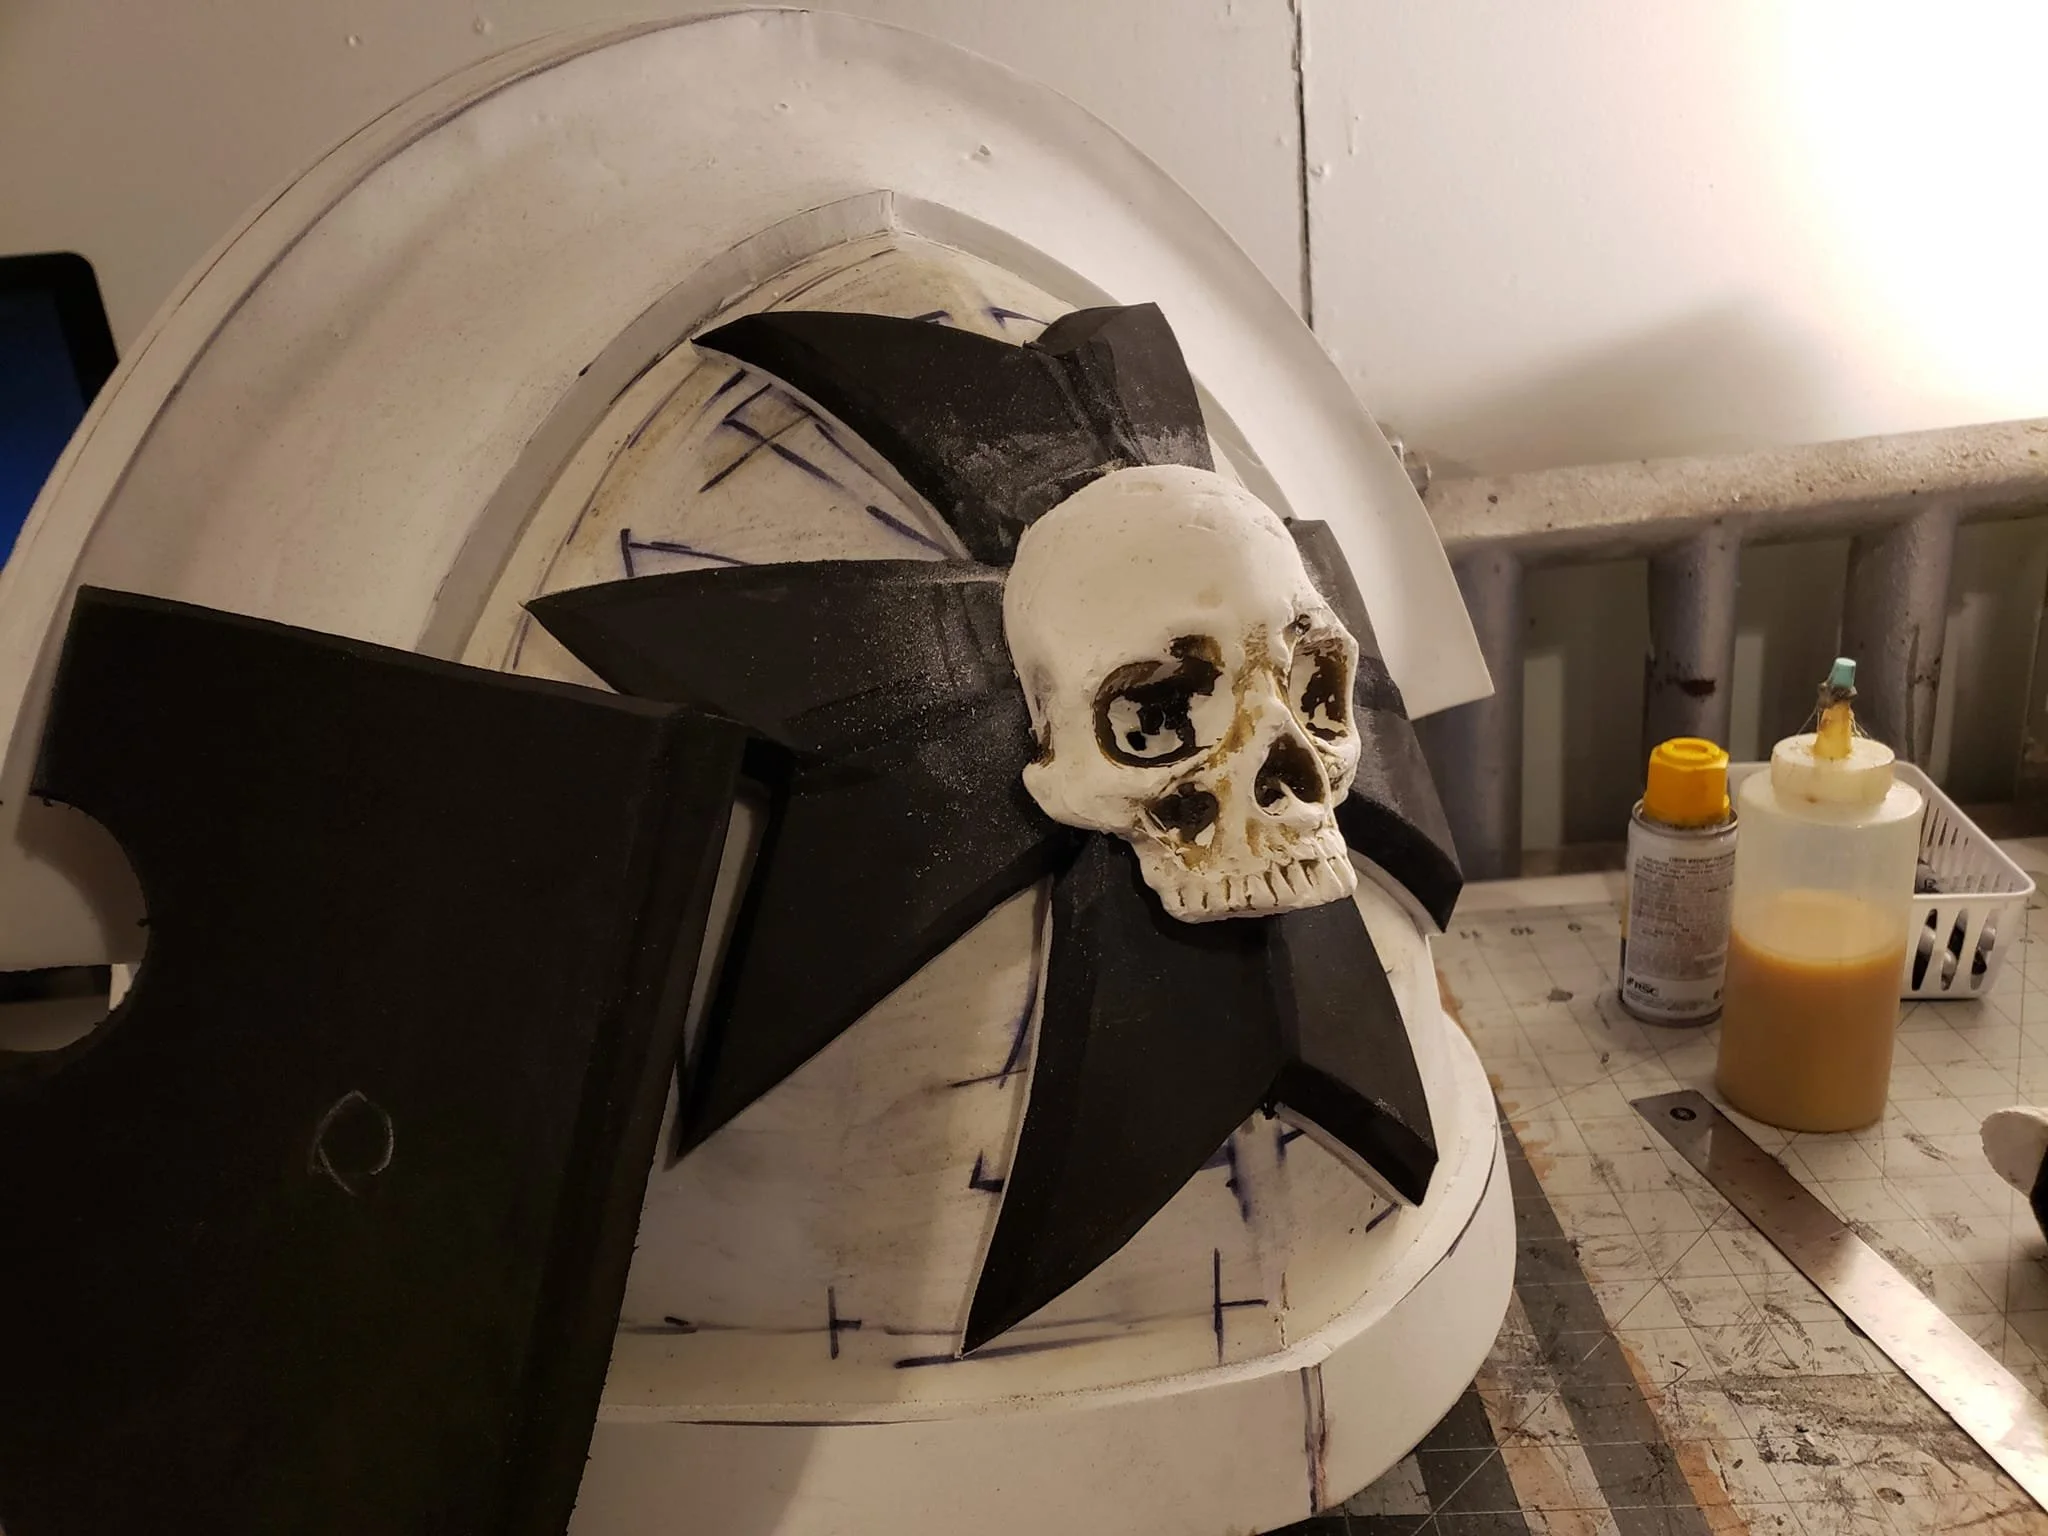
I then started detailing the Pauldrons. I started with the trimming first, and the guard at the top. The shield in front is made of 2 pieces of foam, 10mm and 5mm. I did this solely to maintain its curve. I glued them together bent, and then trimmed the 5mm layer to size afterwords. This way that 5mm piece is always pulling on the 10mm piece into it’s current shape.

I then made the Templar cross and skull. This was a free-handed pattern, using several layers to get it to piece in the center, and to be elevated off the pauldron. The skull is foam clay, from a hot-glue mold I made from a large plastic skull.

A large white foam and cardboard model of a spaceship or futuristic vehicle, partially assembled on a wooden table, with marked sections and structural lines.
A black foam padded piece shaped like a shield, placed on a worn, stained worktable with a cutting mat underneath.
A person holding a black piece of a model helmet with a skull decoration, in front of a white spherical model, on a cluttered work surface.
A worktable with a white skull figurine attached to a black star-shaped decorative object and various tools and bottles nearby.
Person holding a black leather piece with a zipper and two button fasteners, on a cluttered worktable with tools, masking tape, and a skull prop.

This write up still needs finished, please come back later.